Introduction
The Dianomi server to server (s2s) integration is an alternative to normal cookie based conversion tracking integration that avoids the use of third-party cookies. This significantly increases the accuracy of conversion tracking in these days of 3rd party cookie blocking, in some instances this can improve tracking accuracy by up to 80%.
Privacy
When users click on our ads we generate an id for each click which we send to you in the URL. Then you can send us back that id to indicate that a certain event has subsequently occurred.
This data is stored in relational databases and log files, and retained as per our retention policy.
We use the data stored in the relational database – including the IP address – to determine if the click originated from a human or is likely robot traffic.
We use the data stored in the relational database – excluding the IP address – for aggregated / anonymised purposes to report back to advertisers on their conversion data.
As per above, Dianomi collects personal data (IP address) initially for legitimate interests (for fraud detection) purposes.
The IP address is aggregated and anonymised before use for analytics.
How do I set it up through a third party platform?
Often third party tracking systems use S2S passback to report events back to Dianomi, examples of third party tracking systems are Appsflyer, Adjust, Tune and Branch.
You will add a dynamic click parameter to your destination urls that supplies a click id for each ad click, Dianomi can help put this in place if you would like. For example, if your landing page is:
We will send users to:
https://www.example.com/&utm_click_id=:clickid
Where :click_id is replaced by a unique id for each click, such as:
https://www.example.com/?utm_click_id=1234
You will then store this click id on your website (possibly by use of a first-party cookie, or in a database as you prefer), then you are required to add this parameter to our pixel url when you trigger the conversion pixel (later, when the user converts). For example the conversion pixel might be:
https://www.dianomi.com/pixeltrack.pl?t=client&utm_click_id=:click_id
In our example above you would use this url:
https://www.dianomi.com/pixeltrack.pl?t=client&utm_click_id=1234
How do I set it up using javascript s2s integration?
Dianomi provide javascript tags that offer a basic server-to-server integration. This is not as good as a full server-side integration but is quick and easy to implement.
There are two javascript tags to integrate.
- Landing Page
This tag should be placed on your landing pages for your dianomi campaign:
<script>
(function () {
  var FIELD_NAME = "utm_click_id";
  var urlParams = new URLSearchParams(window.location.search);
  if (urlParams.has(FIELD_NAME)) {
    window.localStorage.setItem("dianomi_click_id", urlParams.get(FIELD_NAME));
  }
})();
</script>- Conversion Page
This tag should be placed on your conversion pages:
<script>
(function () {
  var T = "test";
  var click_id = window.localStorage.getItem("dianomi_click_id");
  if (click_id !== null) {
    var img = document.createElement("img");
    img.width = 1;
    img.height = 1;
    img.src =
      "https://www.dianomi.com/pixeltrack.pl?t=" +
      T +
      "&utm_click_id=" +
      click_id;
    document.body.appendChild(img);
  }
})();
</script>
DOWNLOAD A TXT FILE WITH THE ABOVE SCRIPTS
Please ask your Account Manager for your custom tag. They will inform you of the correct value for you of the “T” parameter and may supply this pre configured. If you want to measure multiple different conversion events (eg. registration, deposits, sign-ups) please let your account manager know as you will need to have a different “T” parameter for each conversion event.
You will also need to add a dynamic click parameter to your destination urls that supplies a click id for each ad click, Dianomi can help put this in place if you would like. For example, if your landing page is:
We will send users to:
https://www.example.com/?utm_clickid=:click_id
Where :click_id is replaced by a unique id for each click, such as:
https://www.example.com/?utm_clickid=1234
How to set up S2S with Google Tag Manager (GTM) using the Javascript integration
Step 1. Set-up the Landing Page tag in GTM
Create a custom HTML tag on GTM and add in the Landing Page tag in the HTML field. See below the example screenshot:
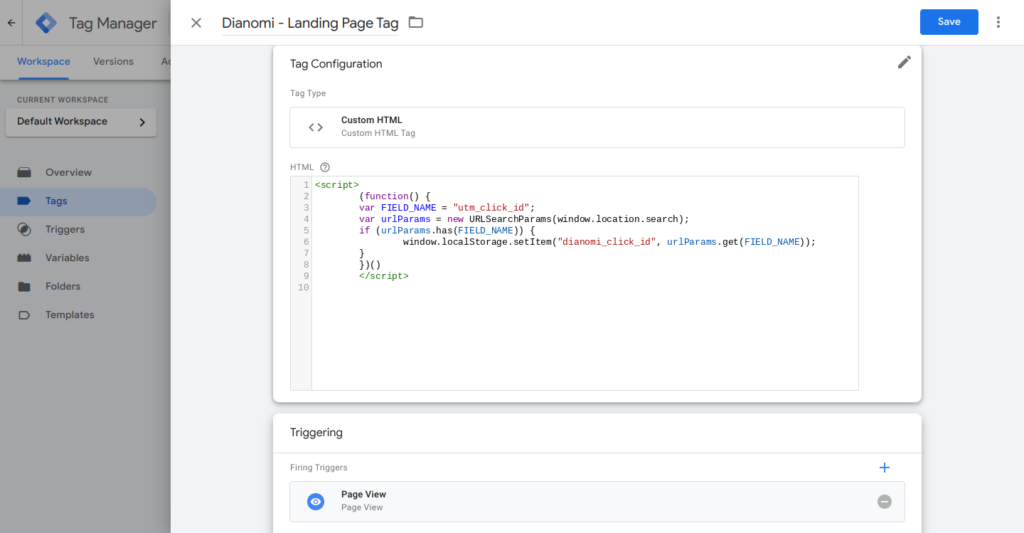
Then add the triggering for this tag, you can set this to all pages views or to the page views on destination urls your campaigns are going to.
Step 2. Set-up the Conversion Page tag in GTM
Create a custom HTML tag on GTM for the Conversion Page tag. See example below:
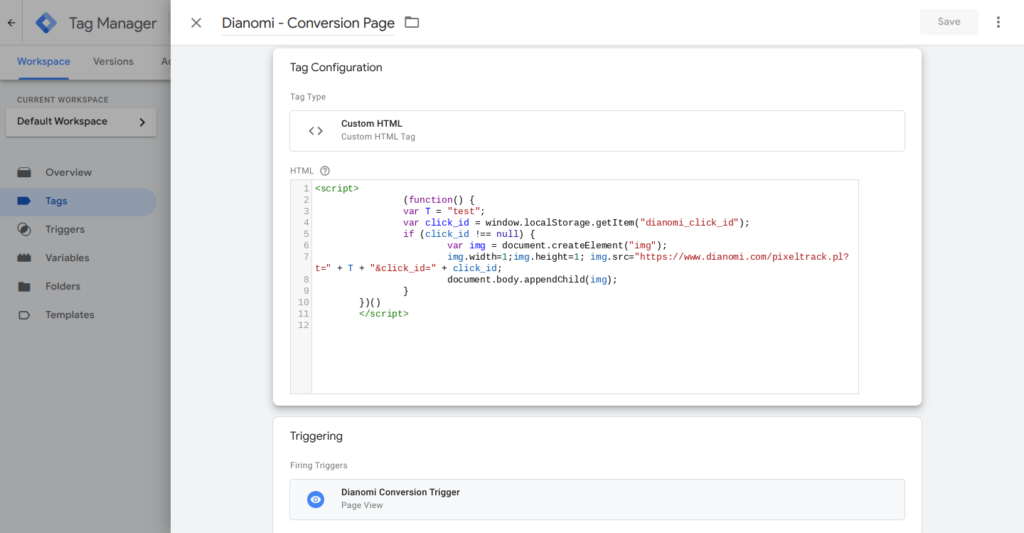
Please ask your Account Manager for your custom tag. They will inform you of the correct value for you of the “T” parameter and may supply this pre configured.
Then add the triggering for this tag, this will depend on the goals of your campaign.
The tag can be triggered on a page view url, click and a range of other on site actions.
Your Dianomi account manager can advise the best trigger options depending on your campaign goals.
Once step two is finished then the set-up is complete.
Using DoubleClick click tags? How to pass the click_id utm using Double click tags
If you are using Doubleclick tags then it is possible to append the destination URL (in bold below) but you must check your account to ensure that the user will be re-directed to the appended URL. (Xs have been used to anonymise this example):
https://ad.doubleclick.net/ddm/trackclk/Nxxxx.160898.DIANOMI/B23859244.271148504;dc_trk_aid=xxxxxx;dc_trk_cid=xxxxxx;dc_lat=;dc_rdid=;tag_for_child_directed_treatment=;tfua=?https://www.xxxxxx.com/about-asia/?utm_source=Dianomi&utm_medium=xxxxxx&utm_campaign=xxxxxx&utm_content=xxxxxx&utm_term=:pub_name
Restrictions to using Javascript S2S set-up
The domain between the landing page where the click_id utm is being stored and the conversion page can not change. The click_id is stored locally on the domain and so if the page domain changes then the click_id is not passed to the new domain.
More
Conversion pixel – how to find and deploy
Click URL Macros – Pass Data Directly into Analytics