Setting up Server-to-Server (S2S) Conversion Tracking on your Direct Site
To set up S2S conversion tracking on your own site you need to have technical developer knowledge. We recommend seeking help from a developer within your business for the following steps:
1. Add the following to all your campaign URLs: utm_click_id=:click_id. Make sure it’s included in all destination URLs; otherwise, the S2S tracking won’t work. Here’s an example of a landing page URL:
https://www.exampledomain.com/?utm_campaign=testcampaign&utm_source=dianomi&utm_click_id=:click_id
If you are using DoubleClick tags, you can append the destination URL (highlighted in bold in the example below), but ensure that your account is configured to redirect users to the modified URL. (Example anonymized with Xs):
https://ad.doubleclick.net/ddm/trackclk/Nxxxx.xxxx.xxxx/xxx.xxx;dc_trk_aid=xxxxxx;dc_trk_cid=xxxxxx;dc_lat=;dc_rdid=;tag_for_child_directed_treatment=;tfua=?https://www.xxxxxx.com/xxx/?utm_source=Dianomi&utm_medium=xxxxxx&utm_campaign=xxxxxx&utm_content=xxxxxx&utm_term=:pub_name&utm_click_id=:click_id
2. Then store this click_id on your website (possibly by use of a first-party cookie, or in a database as you prefer) when someone lands on your website via a Dianomi ad.
3. Once a user completes a conversion goal the below passback conversion pixel is then sent back to Dianomi, with two updates:
https://www.dianomi.com/pixeltrack.pl?t={tagid}&utm_click_id={:click_id}
{tagid} – is updated with the conversion tag id of the completed conversion.
{:click_id} – is updated with the stored click_id from when they landed on the website.
If the above is not possible or difficult to set up you may find it easier to set up Server-to-Server (S2S) conversion tracking using GTM. If you need more information or have any questions please ask your Account Manager for advice on this or email [email protected].
You can also download Dianomi’s S2S Conversion Tracking Integration Guide here.
How to set up Server-to-server tracking with 3rd Party Tools
Often third party tracking systems use Server-to-Server passback to report events back to Dianomi, examples of third party tracking systems are Appsflyer, Adjust, Tune and Branch. Often these 3rd Party tools are used to report back App performance where other analytics tools can not measure performance.
Generally all these systems need the below three details defined:
- The click id utm parameter – ‘:click_id’
- The conversion tag id (aka event id) – tag id set up on the conversion tag manager page
- Passback url – https://www.dianomi.com/pixeltrack.pl?t={tagid}&utm_click_id={:click_id}
{tagid} – is updated with the conversion tag id of the completed conversion.
{:click_id} – is updated with the stored click_id from when they landed on the website.
All third party tools have different interfaces and how the above details are managed and input into their websites. If you want advice on a particular third-party tool please contact your account manager or email [email protected]. Below is a bit more information on setting up tracking with two third-party tools Appsflyer and Adjust.
How to set up Server-to-server tracking with Appsflyer
AppsFlyer is a mobile marketing and analytics platform that helps businesses measure, analyze, and optimize their marketing campaigns across various digital channels. It offers tools for attribution tracking, marketing analytics, fraud protection, and customer engagement, enabling marketers to make data-driven decisions. The platform emphasizes privacy, offering solutions for iOS 14+ compliance and protecting user data. AppsFlyer also integrates with a broad ecosystem of partners, providing detailed insights and enabling businesses to enhance user acquisition, retention, and lifetime value.
Below are the set-up steps:
1. Once on your Appsflyer account go to Active Integrations on the sidebar.
2. Once on Active Integrations, as a Marketer, you can add Dianomi as a partner by searching for Dianomi in the search bar at the top of the page.
For further information about adding Dianomi as a partner via Appsflyer see the below resource:
https://support.appsflyer.com/hc/en-us/articles/360000844778-Partner-activation-deactivation
3. Before taking the next step, please make sure you have spoken to your Dianomi Account Manager and confirmed the events you want to measure and that you have been provided with a tag id for each event.
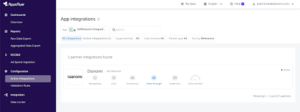
4. Once Dianomi has been added as a partner and you have the tag ids you click on View-Through on the Active Integration page to create your tags.
5. Once you have arrived on the Dianomi Integration page you can create the rules for your tracking.
See below an example of this page. Highlighted in red is where you add the tag ids provided by your Dianomi Account Manager.

Please make sure the below is set:
- The Activate partner toggle is set to active.
- The Client Tag ID field has been updated with the App Install tag id provided by the Dianomi Account Manager.
- The Install view-through attribution toggle has been set to active.
- As the default postbacks you have this setup for Install events and to only for users from ‘This partner only’.
- The in-app event settings has been updated with the App Install tag id provided by the Dianomi Account Manager.
- If you want to measure in-app events, please set the In-app event postbacks toggle to active, if not leave it as inactive and miss the next steps below.
- If you are measuring in-app events first, set the timeframe you want to measure these events and then add a event field where you can first select the in app event you want to measure using the Appflyer event dropdown, in the ‘mapped to partner event add the tag id for the event you want to measure provided by your Dianomi Account Manager, set the event to only be measured for ‘This partner only’ and no values & no revenue to be measured.
If you are measuring more than one in-app event you can add further event fields and use the corresponding tags for each different event.
Once the above has been completed you can save the integration at the bottom of the page.
6. Once saved you can go to the Attribution link tab which is found at the top of the page.
7. Once on the Attribution link tab you should find the attribution link type automatically set to ‘Use a single-platform link and the Attribution link parameters are already created for you with Campaign Name, Site ID, Ad ID and Custom Parameter 1.
8. Towards the bottom of the Attribution Link page you will find the Click-through attribution link and the View-through attribution link, for both of these you can set the time frame you measure the attribution. These links are used as the campaign urls for the Dianomi campaigns, if you are running a Dianomi Managed account send these links to your Account Manager to use in the set up of your campaigns.
If you have any difficulty with the above please contact your Appsflyer account managers for advice as well as contact your Dianomi Account Manager or email [email protected].
How to set up Server-to-server tracking with Adjust
Adjust.com is a mobile marketing analytics platform that helps app developers and marketers track and analyze user interactions across mobile apps. It provides comprehensive tools for attribution, analytics, fraud prevention, and audience segmentation, allowing businesses to measure the effectiveness of their advertising campaigns and optimize their marketing strategies.
Below are the set-up steps:
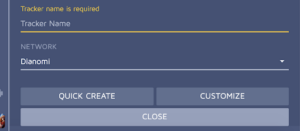
1. Create a Conversion tag id for the goal you want to measure using Adjust.
2. Go to your Adjust account and go to ‘Trackers’ and create a new tracker with the Network set as Dianomi. When creating the tracker on Adjust you will then provide the conversion tag id as the event ids for the trackers.
If you have any difficulty with the above please contact your Adjust account managers for advice as well as contact your Dianomi Account Manager or email [email protected].